Apr, 10 2017

Working with Style(s) in Posterino 3

Posterino has some built-in magic to support you in your work on a Posterino document. For example, you start a plain document and e.g. add a red border to all existing images. When you then add a new image, it comes with a red border automatically. Kind of what you would expect to happen, right? This Posterino behavior is powered by a feature we call Styles. In short, styles are:

 A fast and easy way to customize the look and feel of your document.

Generally Posterino Styles work their magic in the background and you don’t have to spend any thoughts on them. But there are ways to bend the power of Styles to your will. This post explains how.

Let’s assume we are working on this sample document:

Note that the images of our sample document not only have different frame colors but also various image filter, metadata and caption settings. The document looks like a mess and we should clean it up a bit. We like to align the overall look of our document. In the following you find several examples of how to achieve this goal.

Copy a style from one image to another

To copy the style of e.g. the blue framed image to the red framed image do this:

1. Control-click the image which should serve as the source of the style and choose Copy Style from the context menu. In our example, we copy the style of the image with the blue frame:

2. Control-click the destination image (the one with the red frame) and choose Paste Style:

Now we have copied the style of one image to another. Not only did we copy the color and thickness of the frame but also the image filter, frame edge setup and all additional layers of the source image like the caption layer:

Align the style

To align the style of all images of a document:

1. Control-click on the document or one object and choose Align Styles from the context menu:

The selected images are now align to a common style which based on what the majority of images look like:

Copy a style from one image to all others

To align the look of all images to the look of one particular image:

1. Control click the image which should serve as the blueprint for all other images. For our example, we pick the image with the white frame. Choose Align Styles to Selection:

Now all images look like the selected “blueprint” image:

Summary

As you can see, there are several very handy ways to help you get the overall look of your document right. Also the methods described above are a great way to “play” with different looks fast and easily.

Did you enjoy this article? Did I miss something? What should be the topic of my next How-To post? Just let me know in the comment below!

Don’t miss the next How-To blog post: Follow me on Twitter

For questions, comments, tips, or feedback, find me on Twitter, Mastodon, or just email me.
Jul, 15 2015

Posterino 3.2 with new Mosaic-Crop feature

Wouldn’t it be nice if Posterino could automatically create a mosaic like the one in the middle of this image:


At least this has been the question of Posterino user Danny. By the way, check out his awesome work at http://smartdoll.jp. His feature request made me think. And well, as of Posterino 3.2 it can!

To create a mosaic from an image, just select a set of image frames:

apply_mosaic_crop_step_1

And Drag & Drop one image from the image browser to one of the selected image frames:

apply_mosaic_crop_step_2

Basically that’s it.

In case of ongoing work on a mosaic where you e.g. manually improve the layout, there is a “Apply Mosaic-Crop” context menu command to bring your mosaic crop back in shape when you select all image frames in question:

update_mosaic_crop_step_2


Posterino 3.2 is a free update for all customers of version 3. Enjoy!

For questions, comments, tips, or feedback, find me on Twitter, Mastodon, or just email me.
May, 02 2011

How do I run the latest Posterino beta and my Mac App Store copy side by side?

Mac App Store does not allow the distribution of beta software, which is actually a good thing. However, from time to time you might like to run a beta version. For example, we just implemented a “Snap to Guides” feature and made it available as a beta several weeks before the feature actually appeared on the Mac App Store version of Posterino.

In this article I would like to talk about two things:

  1. How to run a Posterino beta version side by side with a copy of Posterino purchased through the Mac App Store.

  2. How to sign up for our beta version e-mail notification service.

Why would you like to run beta software?

Lets talk about why you would like to run beta software in the first place. The reasons are numerous:

  • The Mac App Store review process takes some time and you might like to get your hands on the most current version of Posterino as soon as possible.

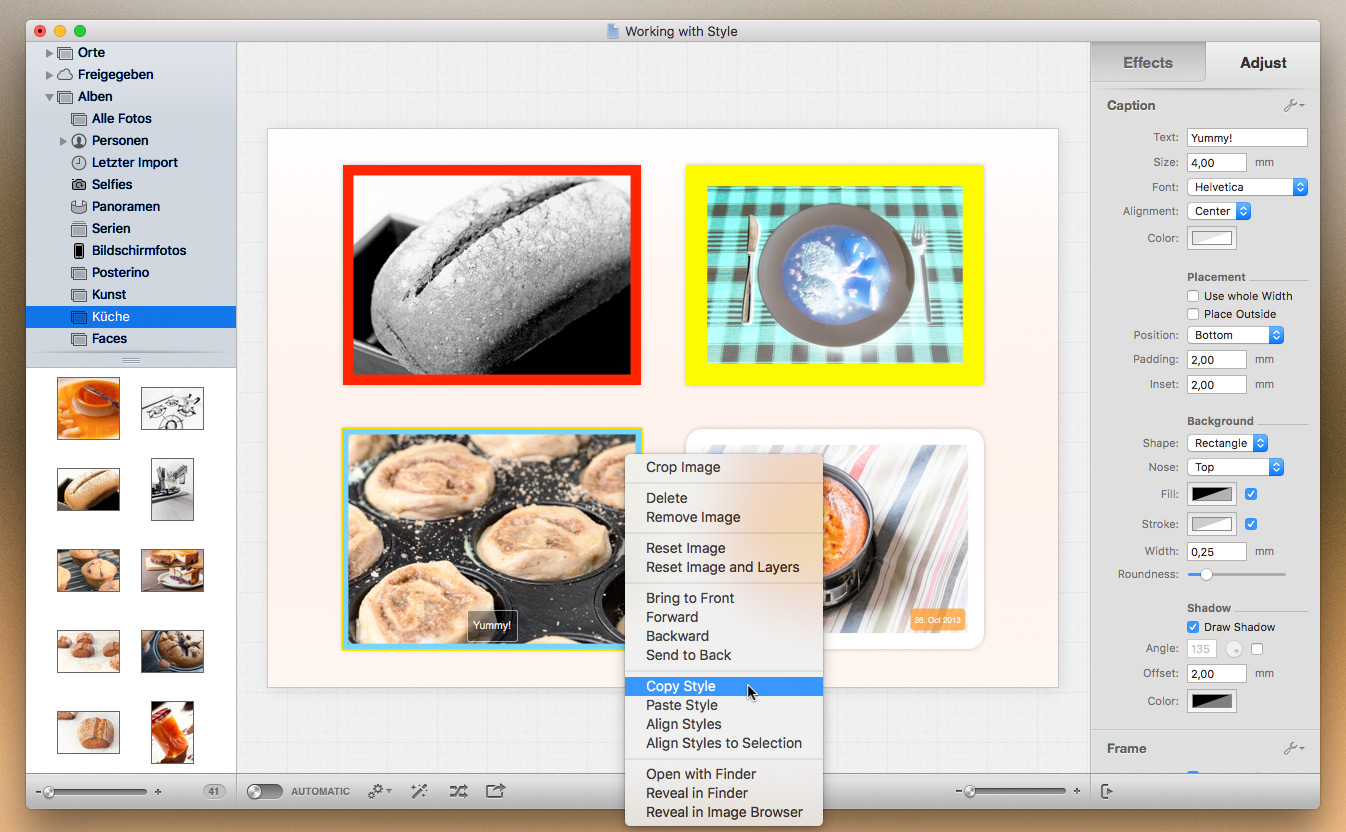
  • We implemented a new feature which you (among others) requested and we like to give you the chance to be the first to play with it, like the “Snap to Guides” feature that was requested by many of you. Generally on these occasions we send out invites with a link to a beta version.

  • A beta version fixes a problem you’ve encountered, but this version of Posterino is not yet available on the Mac App Store.
  • You’d simply like to stay on top of the development.
  • You just need the pure thrill of running beta software. In this case, please also contact the local branch of the Beta Addicts Anonymous support group.

Install beta software

First, one word of caution: Some folks really like to get their hands on the latest “bleeding-edge” trunk of some kind of software. But running beta software is clearly not everybody’s business. If you feel uncomfortable with this kind of stuff, just don’t run it! No shame!

This post is made for the folks who like to get their hands dirty and run a backed up system!

To run a beta of Posterino we have to understand one thing: Technically the copy of Posterino purchased through the Mac App Store and the beta (or regular version) downloaded from our site follow two different licensing models.

This boils down to one simple fact: The copy downloaded from our site will stay in demo mode!

However, this does not pose a problem at all, you just have to make sure to use the copy of Posterino purchased through the Mac App Store to export your document without the demo watermark. It’s that simple.

Here’s a more detailed workflow:

  1. Download a beta from our site and unpack the ZIP file.

  2. While finding a place for the beta, don’t override the Mac App Store copy of Posterino in your Applications folder. You have several options here:

    • Put it on your Desktop.
    • Rename it to something like “Posterino-beta” and put it in your Applications folder.
    • Put it somewhere else. Maybe you already have some kind of “Beta Stuff” folder.
  3. To create and edit your Posterino document use the beta version (or your Mac App Store copy).

  4. To export your document switch to your Mac App Store copy of Posterino.

That’s it.

To get rid of the beta

If you are done with the beta copy of Posterino and you don’t need it any longer, just drag it into the trash. That’s it. There are no other files to consider.

In case you accidentally overrode your copy of Posterino from the Mac App Store with a beta or you removed your Mac App Store copy altogether, just install it again using Mac App Store. No big deal.

Our Beta Notification Service

If you’d like to get a short notification e-mail every time we release a new beta of Posterino into the wild, just subscribe to our Notification Service. At our current rhythm, new betas are released two times a month. Of course, you can unsubscribe at any time and we don’t share your data with anyone outside Zykloid Software.

For questions, comments, tips, or feedback, find me on Twitter, Mastodon, or just email me.
Apr, 19 2011

How do I (re-)install Posterino using Mac App Store?

In January 2011 the Mac App Store opened as an online store and, since late February, Posterino has been available for purchase on the Mac App Store. Because the opening of the Mac App Store has changed the software distribution model we’ve all known for quite some time, we’ve had to learn some new tricks to operate this new beast and cope with some of its pitfalls.

Today I’d like to show you how easy it is to install or re-install software on your Mac using the Mac App Store.

Say, …
… you removed your copy of Posterino from your Mac
… you have a new Mac and want to install the software already purchased on Mac App Store
… you replaced your copy of Posterino in the Applications folder with a (beta) download from our site
… you want to install Posterino on a different Mac

The following steps are true for every application you purchased on the Mac App Store. Not just Posterino.

  1. Prerequisites: If you have a beta or demo version of Posterino in your Applications folder which you would like to replace with the copy you purchased through the Mac App Store, go to your Applications folder and drag Posterino to the trash. Also make sure there is no other copy of Posterino flying around on your system. Use Spotlight to search for “Posterino”.

  2. Open the Mac App Store.

  3. Go the “Purchases” tab by clicking the “Purchases” toolbar button or choose “Purchases” from the “Store” menu.

  4. If necessary, sign in using your App Store / iTunes credentials.

    The Mac App Store application will show a list of applications you already purchased.

  5. Click the “Install” button for any application you would like to install.

    (If the button reads “Installed”, you did not remove all copies of Posterino from your system. Go back to step 0.)

That’s it. You are done.

Once you realize that you can easily remove applications from your Applications folder without the fear of losing something, it becomes apparent that the Mac App Store will make your Mac maintenance much much simpler.

For questions, comments, tips, or feedback, find me on Twitter, Mastodon, or just email me.